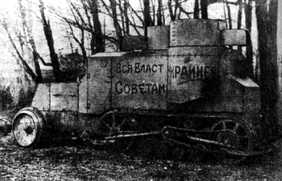
Russian Austin-Putilkov halftrack captured by the Poles - 1920
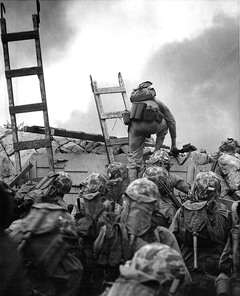 Scaling the seawall at Inchon Scaling the seawall at Inchon Whenever I start playing with a new system, I start to wonder about where the system's limits are. Sometimes, with Panzer Leader, for example, I didn't have to look very far. Arab-Israeli Wars was just coming out when I bought my copy of Panzer Leader. ASL is a system that has never really explored its limits. Sure, there has been some playing in the margins with Critical Hit releasing modules for the Spanish Civil War and the first Arab-Israeli war, but nothing that really tests how far the system can go. So, what are the limits? Here are my thoughts. Going back in time, the main limit appears to be doctrinal. In World War I and before, most nations' doctrine was based on mass and formations, as opposed to small unit maneuver. To use an obvious example, Pickett's Charge at Gettysburg was lines of infantry who marched in lockstep towards the enemy and charged when they were close enough. Later in the century, warfare among the industrialized nations focused on massed fire from trenches and other prepared positions which led to the trenchlines of World War I. Neither of these models lends itself to good ASL scenarios. After World War I, however, things change. As tactics change from prepared positions to maneuver, opportunities open up for good ASL scenarios. The radical changes to European boundaries after the war, and the resulting border skirmishes, lead to a variety of different scenario opportunities. In particular, the Russian Civil War, the Polish-Soviet War of 1919-1921, the Soviet-Japanese border wars, and the Spanish Civil War are worth looking into. [Now I want to do a scenario pack based on Pancho Villa. . . . ] Going into the future, doctrine remains relatively constant, but technology becomes the limiting factor. With the rise of rocket propelled munitions, ranges extend far beyond the one or two ASL boards most scenarios use - even for many infantry carried munitions. Helicopters also muddy the waters, as they provide machine guns and small calibre artillery that can essentially teleport around the battlefield. That still gives some 20 years with plenty of conflicts to explore; the collapse of the British and French colonial empires, Korea and the Chinese Civil War probably being the largest areas of interest. There are certainly some battles outside these time limits that would make good scenarios. In particular, some modern day insurgent battles would probably fit the system quite well. To use a modern example, an "Iraq Pack" featuring scenarios between the Iraqi Army, ISIS and the Kurds would probably have plenty of material. In fact, insurgent actions in general might still work in the ASL system, as the insurgents generally don't have larger ordinance and airpower, and they generally don't engage government forces that have that kind of support available. Even with these limits, there is about thirty solid years of military history to explore with conflicts all over the globe. It's a testament to the robustness of the ASL system that it can handle conflicts ranging from Poland in 1919 to Inchon in 1950. that's enough scenarios [and counters] to last several lifetimes. [Photo credits: (1) Public domain (2)Naval Historical Center via Wikipedia |
2 Comments
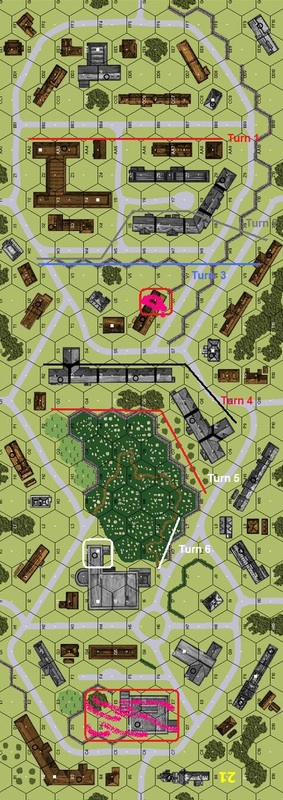
There was some small consolation from being eliminated from the Grognard tournament - it meant I could play in one of the mini-events of the weekend. There were three options; The Emperor's Katana [all PTO], Italian Stallions [all Italian scenarios] and 50/50 [all scenarios rated 50-50 on ROAR]. After threatening physical violence if I had to play Italians again, I played in the first round of the 50/50 event Game 3 -- G44 - Abandon Ship! [Americans vs Al Salzman] This is a basic Bulge scenario. The Americans start with a company, supported by a couple MMGs and 4 bazookas against a reinforced company from Panzer Lehr supported by 4 tanks. Unlike the Italian ones from the previous day, where a modern Volvo probably has better armor, those are real AFVs - Panzer IVs & Vs. The Americans have to do a fighting withdrawal where they receive VPs for getting off the map, while the Germans get VPs for getting to the last fifth of the map 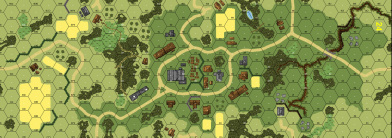
Map 24. The Germans enter from the left, and have to get beyond the gully on the right side to count for VPs
 For the Americans, this scenario presents two challenges. One of them is obvious - bazookas can't go toe-to-toe with Panthers. Literally. Side and rear shots are pretty much the only thing that is effective and even then nothing is guaranteed.
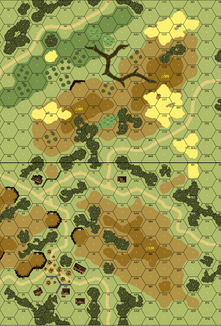
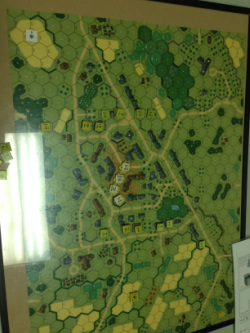
The second challenge is more subtle. The Americans have to withdraw off the board to win the game. Given the decent terrain they set up in, the Americans can hold the Germans out of the village for several turns. so many turns, in fact, that they won't be able to withdraw off the board fast enough. As for this particular game, it was fairly close throughout. I held the Germans close to their entry side through turn three, then started to pull back through the village. It wasn't the best withdrawal by any stretch, but I'm not embarrassed by it either. Throughout the game, Al did a masterful job of managing his tanks, offering me only one side shot the entire game [it, of course, missed] By Turn 6, I had one stack ready to move off board, and could still win if I could keep those tanks tied up for one more turn. Unfortunately, the entire stack broke to a long range MMG shot [at 2 -2] and the two leaders leading two separate half-squads into close combat with the Jagdpanther became the two leaders ineffectively CCing by themselves [the 10-2 leading the 8-0]. My exit stack routed into the gully, the tanks crossed over the gully, and the rest was history. Still, it was a good scenario, and Al is a great person to play with. If a couple of die rolls went my way, the results could have been quite different. Sometimes, that is all you can ask for. Game 4 -- RPT 73 - Sausage Hill [British [Indians] vs Hayes Wofford] Remember how terrible my dice were in my first scenario? Well, this game made up for it. In spades. Sausage Hill sees a mixed British force of roughly a company supported by two mortars and some machine guns defending two hills against an equivalent Japanese force supported by two guns [an INF and a MTR] and a flamethrower. The Japanese have five turns to drive the British off Hill 501 and Hill 505 on Board 61. [the top half of this map] One of the keys of the game for me was being able to neutralize the Japanese guns early on. Hayes decided to shoot at infantry on Turn 1, so I could reply by shooting smoke at the guns. For much of the rest of the game, those guns were shooting out of smoke, which made them pretty ineffective [plus one of them broke on Turn 3, which didn't hurt a bit]. Not that I did a great job with my guns either, but the defense can be more forgiving. Hayes did a pretty good job of moving his squads up and quickly breaking my right flank with fire. I was bracing for the inevitable banzai charge to drive me off Hill 501 - which never came. Instead, the Japanese moved towards the center trying to work their way through the jungle to get into the saddle between the two hills. That ended up taking far too long and allowed me shots at his leaders, which are crucial to a Japanese attack. Still, the Japanese were close to victory. Hill 501 became undefendable after Turn 3, but I was able to get most of my forces over to Hill 505 in somewhat good order. Turn 5 was the, now leaderless, Japanese needing to break/kill MMCs in 5 different hexes including the woods in 61CC4 and the gully in 61BB5. He got three of them, but the fourth and fifth were pretty much out of reach, so the British squeaked out a win. As I end this Bitter Ender report, I wanted to thank Mr. Sheppard and his crew for putting on a great event. They did a great job of ensuring that everyone was actually playing, especially new people like me who didn't know anyone on the tournament circuit. Definitely looking forward to the 2015 event when I have some more games under my belt. 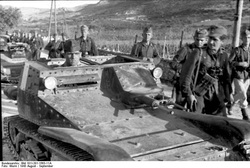 Italian L3/35 tanks. Italian L3/35 tanks. It's been a week since Bitter Ender 2014, and things are [mostly] caught up, so I can spend some time with an AAR. No long descriptions, probably few photos, but here is a paragraph or two on the games played this weekend.
Game 1 - ASL137: Italian Brothers [Nationalists vs Anthony Flanagan] For my first game of the Grognard Event, I was paired with Anthony Flanagan. Given that all the scenarios in Round 2 are from the PTO, I suggested an ETO scenario and we settled on Italian Brothers. Italian brothers is a basic scenario using half of boards 6 & 17. The Nationalist [Italians of the Condor Legion] have about 6 companies decently led and supported and three pre-war tanks against a Spanish Republican [Allied Minor] force of about 4.5 companies with slightly better leadership and slightly worse support. Victory is mainly based on hex control. This may not have been the best scenario for me to choose because;
Still, those issues pale in comparison to the bigger issue of not understanding the scenario. Since the victory hexes are close to the Nationalist entry point, I assumed that I would get to them first and the Republicans would have to take them from me. This is, in fact, the exact opposite of what happens. Since the Republicans go first, they can grab, or at least deny, several VP hexes to the Nationalists, and the Nationalists are the ones who have to attack. As you can imagine, that completely changes the game plan. Oh, and did I mention that I lost two tanks by the end of Turn 1? To machine guns needing 4s? And by the end of Turn 2, I had one leader dead and a second wounded? The other 4 turns were just for show - I had pretty much lost the game by the end of Turn 2. That is why I swore I would never play Italians again. It's a lie - the problems had little to do with the Italians and a lot to do with poor play on my part. They are, however, a convenient scapegoat. [Photo credit - Deutsches Bundesarchiv via Wikipedia] Game 2 - AP86: Milling About [Japanese vs Jeff Toney] The loss put me out of the Grognard event, so I was looking for an afternoon game. Jeff Toney stepped up and we agreed to play Milling About. This scenario portrays a meeting engagement between roughly equivalent Japanese and British units in Burma in January 1942. the Japanese win by a combination of moving units off the board and killing Brits. The real gimmick in the scenario is that both sides set up simultaneously, and the first player is selected randomly after setup. This is an interesting mechanic - one I would like to see more often, especially in PTO jungles where enemy units could get on top of each other before being discovered. Unfortunately, it doesn't quite work in this scenario. If the British player gets to go first, they can take their disorganized mob and turn it into a nice line, which makes it difficult for the Japanese to outflank for casualties or exit points. If the Japanese go first, they have a chance of turning a British flank and getting enough exit points to win. In our game, the British went first, did a great job of establishing the line, and prevented me from turning their right flank. Again, it was a game that was over by Turn 3 [ROAR currently shows the scenario as 3-1 in favor of the British. I'd be curious to see how the results compare to which player moved first] At this point, I have to admit I was pretty discouraged. Not by losing - I expected that. Not by bad dice - that happens. I felt, however, that I was playing poorly. That changed a bit on Day 2, but it was a long drive home Friday night. Has it really been two months since I wrote a blog post? That's embarrassing. It wouldn't be too bad if I could say I was playing so much ASL that I didn't have time to write, but that isn't true. Or if real estate kept me so busy I couldn't write, but that isn't true either. Ah well, I should stop looking at the past and just make sure it doesn't happen again. About a month ago, Don Holt and I sat down to play. I asked for a scenario with the British, as I had bought For King and Country, but hadn't used any of it yet. We settled on Scenario 102- Point of the Sword. This scenario, set on D-Day, has a company of Germans, well led and supported by an HMG, an MMG, 3 LMGs and a mortar defending the village on board 10 against an equivalent force of British Commandos. The British also receive a second reinforced company [12 squads] on Turn 4 - halfway through the 8 turn scenario. To win, the British have to occupy two of the three fortified buildings Here was the opening setup - 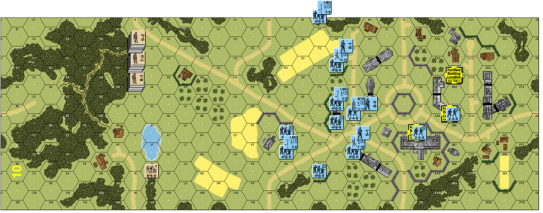
Putting the HMG in V& allows it to fire up both roads - neatly dividing the map into three areas. This makes lateral transfers hard and keeps the British from slipping around the bottom of the map. The two squads forward in R6 and R7 are there to keep the Brits from getting that clump of buildings [and their good TEM] easily. The idea was to have them dash across to T8 when things got hot and work their way back to the rowhouses.
The British set up almost everything in the woods at the top of the map. I think their ultimate goal was to work their way into the woods at P3 before the reinforcements showed up. That could have put me in between a rock and a hard place - needing to redeploy to face the second wave while under pressure from the Commandos. That, however, wasn't what happened. The Commandos did a decent job working their way into the orchard and the woods along the other side of the road, but not much farther. The defining moment was in Turn 2 when the 8-1 and a squad tried to dash across the road. By the time the HMG had finished its five shot rate tear, there was a wounded 7-0, a broken half-squad and a hero. Good times. By the end of Turn 4, the British had cleared out clump of buildings at Q7 and were in the backside of the P3 woods. The British reinforcements also showed up and organized themselves behind the wheatfields in and around L8. Turns 5 and 6 saw the British keep pressure on from the P3 woods while working along the bottom of the map eventually getting into the P9/S9 woods and the building in T8. Unfortunately, one of the British squads went berserk in all the fighting and charged the HMG in V7. This both prevented the MG from firing and pinned 2.5 squads. By the time the British CC phase of Turn 6 rolled around, that rowhouse looked like a New York subway station - 2.5 German squads with a leader, 2.5 British squads with a leader and a few SW for good measure. With many of my squads broken to start with, killing them all was pretty easy. With those squads gone, the rest was a mopping up operation. I only had 3.5 squads left, had lost most of my MGs [still had the MMG and one working LMG] and was going to lose a good hunk of that pulling back into the town across the new British fire lane on hexrow V. It might have taken more that 2 turns to dig me out of the fortifications, but it wouldn't have been fun for anyone. Random comments;
Next up -- Japanese and PTO!  "Sgt. Rock" "Sgt. Rock" [Also known around here as "Like Cattle, They Ran"] Darrell Wright and I got together last Monday evening at Gamer's Armory and decided to play Scenario 14: Silence That Gun. This D-Day scenario tasks seven US Paratrooper squads, well led and supported to attack a somewhat prepared German position. The Germans [me] defend with six 2nd Line squads and six conscript squads, decently led and supported by an HMG, an MMG and two LMGs, plus the AT Gun mentioned in the title. the Americans win by destroying the AT Gun, or by taking a fortified building placed along the south edge of the board 3 town without taking more casualties than the Germans. Oh, and the Germans are ELR2, so those conscripts are pretty much speed bumps before they get disrupted. By SSR, all hill hexes are considered marsh. This means the American are pretty much required to advance through the town - it will take them a long time to go around on either flank. Given anchored flanks, I wanted to restrict the avenues of advance as much as possible. Many of the placement options for the fortified building leave it exposed, but placing the building in 3M5 and the gun in 2N10 let me anchor the flanks on the large marshes. Here's the whole defense 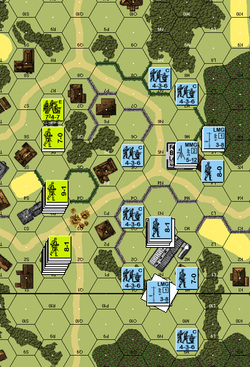 Turn 1 went quite well. The kill stack in R3 traded fire with my own stack in N2, neither doing much to the other. The rest of the American slowly worked their way through the town. By a stroke of luck, I managed to break one of the squads in R1, which routed back to S1, where a conscript squad shooting at long range kept it DM for most of the rest of the game.
Turn 2 was much of the same. German squads started breaking - in particular one of the squads in N2. the Americans were making decent headway, but casualties were running about even. Turn 3 was when everything began to fall apart. The second squad in N2 broke during the American Prep Fire phase. The conscript squads in the area were drawn out shooting at squads moving across the road. That left the American Hero [Sgt. Rock] free to move across the road, hop over the wall and end up in the ground floor of N2 - directly under the HMG. The Germans routed away, and Sgt Rock moved up the stairwell to take the precious HMG. [Map note: There is actually no stairwell in N2, so Sgt Rock couldn't make that advance. Overlooking that probably cost me the scenario]. But wait, it gets better. By the end of Turn 4, Sgt Rock was herding 4 German squads away - everything that started in N2, the conscript that started in O1, plus a squad from M4 that tried to help. That's right, one American hero was herding 40 Germans away [and keeping them under DM so they couldn't rally]. Plus on Turn 5 he set the demo charge he was carrying to destroy the gun and win the scenario. If that didn't give him the Congressional Medal of Honor, I'd be really disappointed. Despite the escapades of Sgt. Rock, this was a good run of an interesting scenario. The Americans have limited forces to attack a German position that is brittle and can not be defended in depth. An interesting tactical problem on both sides. 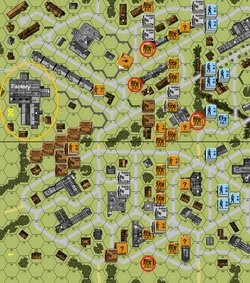 Setup - Squads circled in red are HIP. Setup - Squads circled in red are HIP. As I mentioned in my last post, Voss was gracious enough to offer me a rematch after my debacle the week before. We agreed to plat Scenario 5 - In Sight of the Volga. In this scenario, the Geramns are mounting one of their last attacks to take Stalingrad. They have a full regiment [25 squads] of 4-6-7 1st Line troops with a leader for almost every squad [OK, just 10 leaders, including a 10-2] and plenty of machine guns. The defending Russians have 20 squads - 14 of the 4-4-7 1st Line squads and 6 of the 5-2-7 variety, 5 leaders [topping out at 9-1], 4 machine guns and an infantry gun. The Russians also receive variable reinforcements [Guards squads] averaging about 3 squads a turn starting around turn 3 [based on a die roll] . Victory for the Germans is [essentially] controlling the factory along the west map edge.
The Russian setup is in the picture above. Since the southern[bottom] flank was clearly going to be a "cross street" affair, I set up my 5-2-7 squads there and in the woods along the map seam. The two MMGs were set up to form good lanes of fire and try to keep the Germans separated, especially as they approached the factory. The HIP units were set up in places where they would be a surprise in the mid-game, except for the squad in the woods in the center. I was certain the Germas would try to rush the 1P8 building and use it to work their was through the woods avoiding my MG fire. The HIP squad would delay them a turn, which hopefully would be all that was needed. The German setup was weighted towards the North with two platoons and good leaders prepared to go down the far northern road - which was only really defended by one squad. Defense on that flank just about disappeared on Turn 1, as the 4-4-7 in the rowhouse was KIA'd and the far northern squad broken by the end of the turn. In the center, the Germans sent pretty effective fire across the gully and the HIP squad did delay a platoon for a turn. In the South, the Germans took the buildings that were given to them. Turns two and three were much the same - aggressive pressure in the North which lessened as one went south. By Turn 3, the Germans and managed to get some squads into building 1H2, and I was seriously considering the defense of the line of rowhouses right next to the factory - for seven turns. Despite all that, including an adjacent German squad, the infantry gun kept firing. It wasn't very effective, but it was both a deterrent and a lightning rod for German fire as other units redeployed. Turn 4, however, was when Voss' morale broke. First of all, the poor 4-4-7 that had been herded down the north map edge self-rallied in 1J1, preventing the Germans from racing off-map along the north edge. Then the first set of Russian reinforcements showed up - four Guards squads and a 9-1 leader. Then, to add insult to injury, the infantry gun scored a critical hit on one of the German kill stacks in a stone building. With much of the northern attack stalled, and no pressure elsewhere, Voss decided to concede instead of recording everything for the following week. What Went Wrong, What Went Right It's pretty clear I set up my defense starting from the bottom and working towards the top. By the time I got to the north end, I didn't have enough troops left to do it right. I almost paid dearly for that. Once we got started and I realized my setup error, however, I think I did a decent job getting troops over to the northern flank. Again, the machine guns are set up too far back. Moving them up about three hexes [to, say 1K5 and 1L10] would have made them much more useful. All in all, it was a good scenario against an opponent who is close to me [I think] in skill level. Plus it was my first win, which I will certainly take. Next Up - Scenario 14 - Silence That Gun, which I will forever remember as "Like Cattle They Ran" 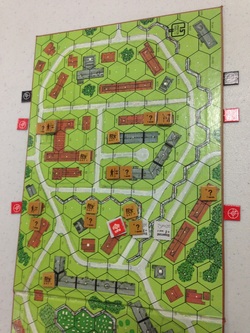 Last Monday, Voss Graham and I sat down to play what would be my first full game of ASL. Voss is a Starter Kit graduate, so we selected one of the earliest scenarios - Scenario 1. The scenario features the remnants of a Russian border battalion attempting to retreat in front of a Finnish Jager Battalion. The two sides are numerically equal, have roughly equal leadership [something the Russians can't say often], and even equal support weapons. The main difference between the sides is the Finns innate abilities - their squads have 50% more firepower, have a better morale, don't cower, and can self-rally. If you were waiting for that sentence to end with "can fly, and they shoot fricking LASER BEAMS," then you remember the Finns well. To win, the Finns need to exit more units off the bottom [south] edge of the map than the Russians. My initial Russian set-up is above. Seeing that beautiful east-west fire lane I set the machine guns forward, planning to move them back after the Finnish Defensive Fire Phase. That was a fatal mistake. By the end of turn 1, the eastern two squads had surrendered and there was a Finnish half-squad behind the western stack in Z2 [and that squad managed to kill the leader and break the last squad in Z1 as they withdrew.
 Last Monday, the stars aligned, and I headed over to Gamer's Armory to hustle up a game of ASL. Forgetting [again] how much traffic delays the Durham to Cary drive, I ended up as the fifth, and last, player to arrive. Fortunately for me, Darrell Wright and Tom Harper had not started yet, and they graciously agreed to find a scenario that had room for three.
We ended up playing WO7 - Hell For The Holidays. This is a Ardennes scenario with 11 American squads supported by 4 Stuarts and an AT gun defending against 7 squads of Panzer Lehr in halftracks supported by 3 Panzer IVs and an SPW 251/9 [a halftrack with a 75* gun]. To win, the Germans need to control 7 stone building hexes north of hexrow P [north of the shorter East-West road in the picture]. The Americans split cleanly in almost half, so I took the northern 6 squads while Tom took the southern 5 squads and the Stuarts. The picture shows the outlines of our setup. I think we both assumed that the AT gun would deter Darrell from coming down the east road, so we concentrated on defending the western approaches. Darrell used Turn 1 to bring the Germans on the board. The halftracks stayed among the [barren] wheatfields while the PzIVs moved up between the two roads. The SPW set up along the map seam just outside of town where it could lay smoke during Turn 2. On our turn, the Americans moved a couple Stuarts south along the east road trying for decent side shots on the tanks to no effect, and moved my squads towards the Germans. For our part, Tom had a god defensive line on the N hexrow, while I set up in the town along the west road Turn 2 things started to heat up. The SPW and one PzIV laid smoke for the infantry to advance in. The SPW, however, also called down our sniper who, with poetic justice, hit the crew of the SPW and forced a recall. One and done. The halftracks moved up to the first east-west road and began dismounting troops while the PzIVs maneuvered for shots. Our AT gun managed to take out a PzIV during their movement. And . . . that was most of the scenario. Tom managed a nice withdrawal under fire to the buildings along row Q at the base of the hill, which anchored him to my Q8-U6 line. Losses through Turn 4 were very light - I think we lost a half-squad, while the Germans had a second halftrack recalled and lost 1 PzIV, a halftrack and a squad. Turn 4 was when we had to call the game due to time. Still, it was a good game, and a good learning experience. Here's what I learned
Right now, I'm working on getting a game for Monday night. This time it will finish, I promise. [UPDATE: We can play Scenario 1 in 5.5 hours, right?] 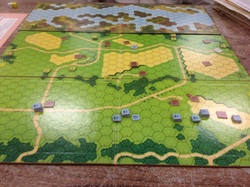 As predicted, I got to play my first game of ASL last night. Don Holt was kind enough to be my tutor as we played Scenario 19 - Backs to the Sea. He even agreed to play the Americans, which was good as I had no real confidence I could run that defense. We started late - there was some miscommunication about where we were playing, but the initial setups are in the picture. My attack plans were pretty straightforward. On the left was a covering force of 3 squads, one MMG, one LMG and a leader. Their job was to get into the woods at 16H9 and restrict movement on that side of the map. My center had six squads, the mortars and a couple LMGs. They would take the forest in the center of board 19 and advance to the bocage in the center of board 16 as circumstances allowed. The bulk of my force was on the right. Two MMG stack were supposed to end up in 16X10 and 16Z9 to isolate the right side of the map. Then I should be able to advance screened by the bocage and get my squads on to board 7. It even almost worked that way. Turn 1 saw the left stack move all the way into 16H10 without incident, advance into 16H9 only to have the revealed half-squad withdraw prior to CC [Lesson learned: units under "?" are hard to pin down], the center started moving into the woods in good order. On the right, MGs advanced to the edge of the shellholes and started firing at the Americans in 16Z9 without much effect. Turn 2 & 3 saw some consolidation. The left keep trying to nail the "half-squad that would not die" with 20FP shots, while the center worked through the woods and eventually up to the bocage. One the right, the unit in 16Z9 eventually withdrew rather than end up in CC with a platoon of angry Germans. On both turns, Don did a great job of working the Americans towards my main thrust. Turn 4 was when things broke open. All of the American units in the center had broken and were routing towards the shellholes at 16O3 and 16O4 where a leader was waiting for them. With a great amount of effort, I managed to get a couple squads into 16O4 [later advancing to O3] to force the Americans to keep routing. With stacks on 16O3 and 16N4, the center was well controlled and those squads could start advancing into the woods on board 7. On the right, I had worked all the way to 16Y4, but the Americans had consolidated in the eastern patch of woods, so advancing could be hard. I did get a squad into 16Y2, which could have been the start of something good. 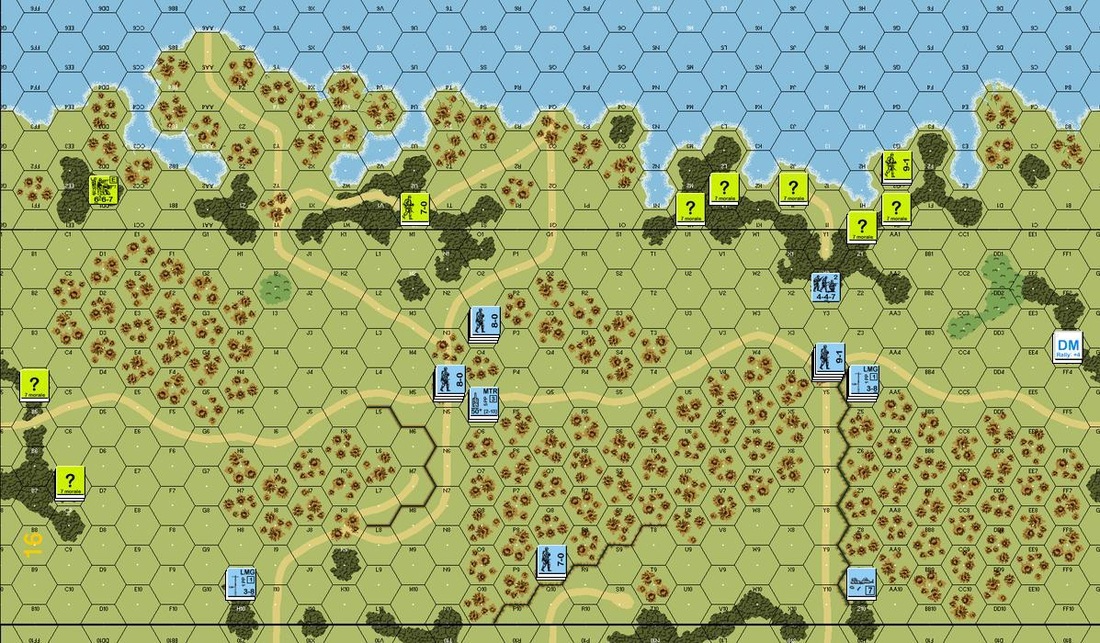 End of Turn 4. The Americans had 4 squads, one mortar and their SMCs in the eastern woods on Board 7 Unfortunately, that is when we had to call the game on account of time. Things were still up in the air - I could get 5-6 squads onto board 7 fairly easily from the center, but would have needed a few squads from the right flank to make it against the remaining 4 squads of Americans. Not an easy road, but a possible one.
What did I learn tonight?
Overall it was a good night. I got to finally push some counters around and didn't make any really foolish mistakes. Should be the start of something good. If everything goes right, I'll be playing my first scenario tomorrow. I let my opponent suggest the scenario and he proposed Scenario 19 - Backs to the Sea. If fit my limits - no vehicles or ordinance and limited to the "Big Three," since that is all I have counters for.
I'm fairly convinced this is an awesome scenario. I say this because I almost had a coronary when looking at the Americans. 8 squads and no MGs to cover 1200 meters of frontage?!?!? How the hell are you supposed to do that? I shrugged, and looked at the Germans. Holy crap! I have to advance with no cover [OK, shellholes] and an ELR of 2?!?! I should end up with a couple half-squads of Hitler Jugend when I'm done. If I'm equally paniced about playing both sides, it must be pretty balanced, right? | AuthorSteve Nicewarner has been a wargamer for over 35 years starting with the original Starship Troopers. Over the years, he has played just about everything from Star Fleet Battles to World in Flames to his current love, Advanced Squad Leader. ArchivesMarch 2014 Categories |
 RSS Feed